Most of us own a delay pedal or two. We've listened to soaring guitar solos with dreamy, ethereal delay layers, or been mesmerized by guys like David Gilmore who take a simple idea, and carefully craft that idea around an effect to give it a whole different vibe. Then, there's the really subtle stuff --the kind of effect that only YOU know you're using and everybody else just thinks... "What effect... it just sounds like a cool guitar?"
We're going to focus on a little of both with this lesson/article. There will be some info on configuring your rig properly for the desired delay effect and some unconventional FX routing using multiple effects paths and even multiple amps. You may not have some of the gear within arms reach at the moment, but the ideas to come will (if you can't do them RIGHT NOW) fuel your creative juices when using delay. At the bare minimum, you will need a delay pedal with a tap tempo, an overdrive pedal, and a good loud metronome!
Here is a quick outline of most conventional delay settings:
Mix (or Dry/Wet... or Level) - Controls the direct, un-effected guitar signal and blends it with the delay effect. When the knob or setting is all the way up, you will only hear the delay and none of the original signal.
Feedback - This sets the number of repeats. More feedback means more repeats. Many units express this as a percentage. When the feedback is at "0," there will be only 1 repeat of the sound.
Time - This determines the speed of the delay and can be expressed in milliseconds, or a note value. Some delay units will allow you to tap a tempo in, and then set your time to a note value based on the tap time. For example, you may tap in a quarter note pulse at 120bpm and then set your delay to eighth notes. Your delay would then repeat 2x as fast as the beat you just tapped in. This kind of box will be ideal for the content in this lesson, but a more basic unit will still work.
Type - Some pedals let players choose from a variety of classic and modern delay effects including reverse, tape delay, dual and quad delays, ping pong delays etc...
Rate/Mod - Some FX units will also allow you to use a primitive 'chorus' effect on your delays. This effect slightly detunes the repeated content to give it a more distinct sound from the original.
LPF or Hi Cut - Your box may have the ability to take away some high end on the repeated content. This is great for ambient delay effects where you want to be able to blur the sound between wet and dry.
We'll be using a series of exercises and musical ideas to explore the delay effect and make the most of your playing to a metronome. Though there are tons of delay sounds and options, we'll mostly (with a few exceptions) be sticking with a standard, single, digital delay. We'll get fancier in later lessons!
Exercise 1
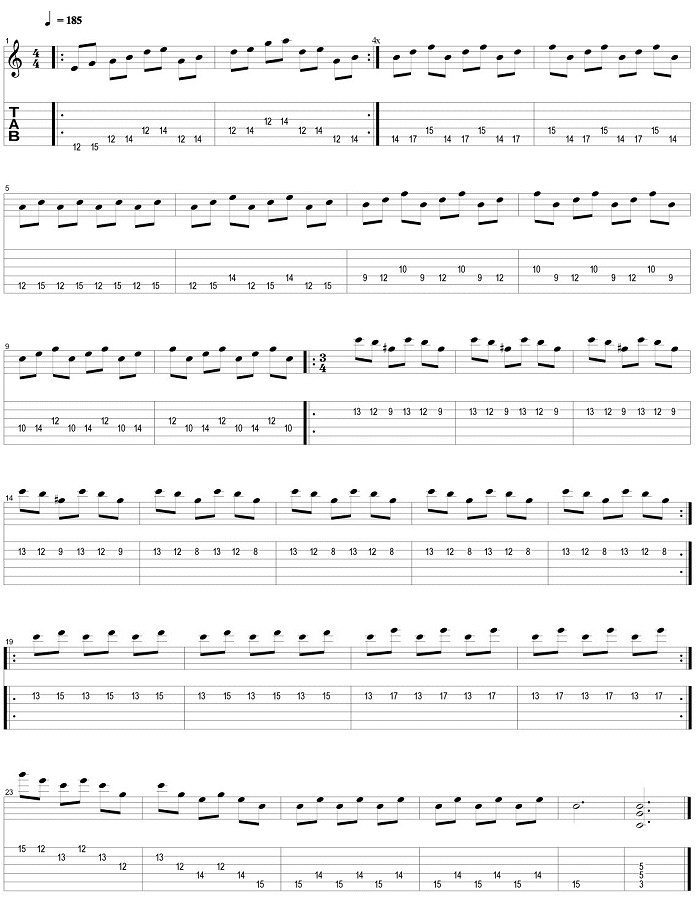
The first exercise is based on a single delay with no feedback and is designed to have a lot of motion built in to the line. The time will be set to a dotted 8th note at a tempo of 185 beats per minute. In case you have a more basic delay pedal, here is what the delay sound against the click track:
When you "dot" a note, you are adding half the value to the given note. In our example, the dotted 8th sound is a full 8th note tied to a 16th note to give it that 'off the click' feel.
Delay Settings:
Mix: approx. 50/50
Time: 1/8D @ 185bpm
Feedback: 0
For best results, your guitar/FX routing would look like this:
Guitar ---> Overdrive Pedal ---> Guitar Amp on clean channel.
You could also put your delay pedal in the effects loop of your amp if you prefer the sound of your amp's overdrive. Just make sure that the delay is AFTER your drive.
Here is the first exercise: (TAB is provided below)
Here is the same exercise played without the delay effect:
Notice how much "faster" it sounds with the delay effect? Practice playing through the TAB without the delay effect on. When you can cleanly play it dry, put in the delay. You can also slow the overall tempo down if you wish. Just make sure to keep the dotted 8th in place and that you are using alternate picking and palm muting throughout.

Note the time signature change from 4/4 to 3/4. For ease of playing, your metronome should be unaccented, meaning each click sounds exactly like all the rest. This lets you put the "1" of every measure where ever you want it.
Exercise 2
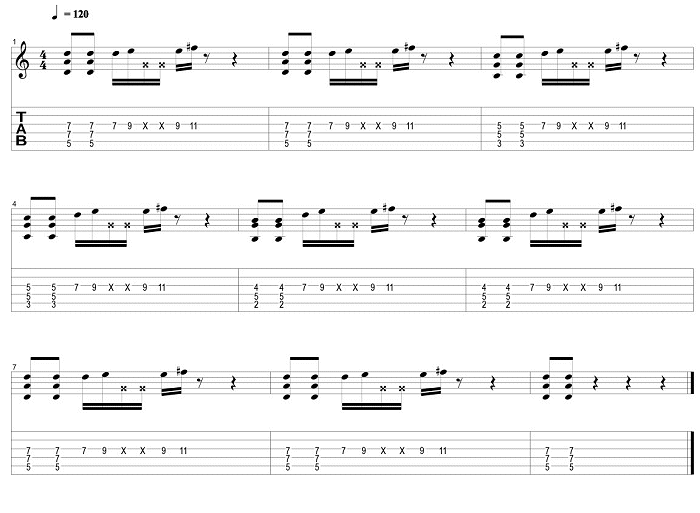
Exercise 2 is based around a half note delay at 120bpm. This means that if you have a metronome set to click 1, 2, 3, 4... 1, 2, 3, 4... etc... and you played a note on the "1" of every beat, the delay would echo back on the "3" of every beat.
Delay Settings:
Mix: approx. 50/50
Time: 1/2 @ 120bpm
Feedback: 0
The same FX routing that was used for Exercise 1 should be used for this exercise.

It actually sounds like there are 2 guitarists playing! This is a good start to a verse riff for a three-piece band that wants to sound bigger live. In this exercise, the delay is being used as sort of a primitive loop effect.
Exercise 3
This one requires either two delay pedals or a dual delay effect. Here are the settings:
Delay 1:
Mix : approx. 60/40
Time: 1/8T @ 120bpm
Feedback: 15-20%
Delay 2:
Mix: 60/40
Time: 1/4 @120bpm
Feedback: 20%
1/8T stands for eighth note triplet or "1 & a" for every beat. Here is what the delay should sound like against a metronome:
There are some tricks to getting this delay to sound right. It will not sound good to feed delay 1 into delay 2 because you don't want all those repeats to be repeated again with a second delay. Your dry guitar and drive signal needs to feed both delays separately. If you're using a multi-effects or modeling rig, this isn't any big deal. If you are using amps and pedals, you get to do a little more tweaking!
The FX setup will require a few more cables and the use of an "AB/Y" switch that allows you to send your guitar to one of two different places or two places at the same time. We're interested in sending to two places at the same time. Here's one way this setup will work:
Guitar ---> Overdrive ---> AB/Y ---> Delay 1 ---> Clean Amp 1
---> Delay 2 ---> Clean Amp 2
Here is a sample of how layered and dreamy this type of delay effect sounds on a slow lead:
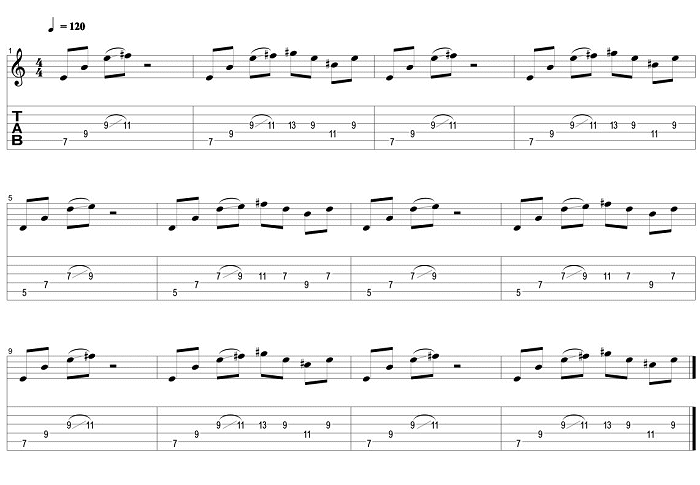
If you don't have the gear to rig up the dual delay setup, just go with the "Delay 2" settings and give the following exercise a try: (Make sure you're metronome is going too!)
 Additional Delay Ideas
If you have any two amps lying around, you can take basic rhythm playing to a new level by 'widening' your sound with a delay pedal. For this next setup, you need only delay pedal, but you'll still need the AB/Y switch. Essentially, you'll be playing stereo rhythm guitar.
Delay Settings:
Mix: approx. 0/100 (yes, 100 percent WET!)
Time: 20-24 milliseconds
Feedback: 0
Here is the routing for this setup:
Guitar ---> Overdrive ---> AB/Y ---> Clean Amp 1
---> Delay Pedal ---> Clean Amp 2
The following audio examples will give you an idea of what a difference this subtle effect can make (Listen in headphones for best results).
Here is just an overdriven guitar through a single amp with no delay:
Now, here is the exact same thing played using the routing described above:
Notice the large wall of sound this effect creates. Here is a rhythm guitar line played with this same effect:
Really, any rhythm will do. Once you've set up your rig, experiment with this stereo guitar setup and see how it affects your rhythm playing. This is a great setup for smaller live gigs where primarily your amp sound is feeding the audience. It makes everything sound bigger!
There is one more delay idea for now. It is called a "Pre-Drive" delay effect. Up until now, the delay has been placed after any overdrive pedals or amp drive circuits. For this effect, it will go before the drive. Here is the routing:
Guitar ---> Delay ---> Overdrive ---> Amp
Delay Settings:
Mix: approx. 70/30
Time: 125 - 200 milliseconds
Feedback: 20%
This is a messy sound and works great for adding a brash, out of control flavor to any guitar driven song. Because the delay before the drive blurs the repeats together, playing slides and bends work very well. They accentuate what the effect is already doing. Here is an example of how it will sound once it is dialed in:
Notice that the repeats are not well defined in comparison to having the drive before the delay effect.
Well, that's it for now. I hope you've enjoyed this first effects lesson!