We’re moving right along in this series of recording and project creation articles. At this point you should be on your way towards starting. We've talked about song structure and preparing a project. In this article, I’m going to be covering what I believe is the best first step on starting your recording project.
Drums!
Now, I’m sure you're all scratching your head right now thinking, “but I want to record guitar!” Well that's true, the drum and beat sections of a track or song don’t always carry the most weight in a production. Heck, sometimes they aren’t there period if we’re talking about a solo guitar track. However, the majority of songs and tracks do have a rhythm section that includes some sort of drum section. Even if that drum section is nothing more than a kick drum and a snare.
Why is it important to start with the drum section? Simple. The drums by and large drive the rhythm. Drums because of their unbiased position in the sound-scape of a production have the advantage of cutting through everything else that is going on. The drummer in a band also leads that band the majority of the time. Thus if you lay down your drum sections in your arrangement first, you’ve got your leader already in place.
This means having at least a general idea about what you want your song or track to look like. I’ll be covering the arranging portion of this task in next week’s lesson. Before we can do that, we need to know just how to program drums to begin with!
Most of us aren't mutli-instrumentalists. Most of us don’t have a drum mic kit, or enough audio inputs to record a drum kit properly to begin with. However, technology has given us a great tool to combat this issue. The drum machine!
Nearly every major audio production suite on the market today includes some iteration of a drum machine. Some are insanely complex allowing control over hundreds of samples and infinitely controllable effects and modulation. While others, are incredibly simple.
For the purpose this article, I’m going to be using Reason’s “ReDrum” drum sequencer. If you have a copy of reason, now would be a good time to open it up, and add the ReDrum into your rack.
The ReDrum sequencer remains one of my favorite drum machines. Even if I don’t specifically use Reason for production. ReDrum is intuitive and in my opinion emulates the realism and nuance of a human drum player better than nearly every other drum machine packaged with an audio suite.
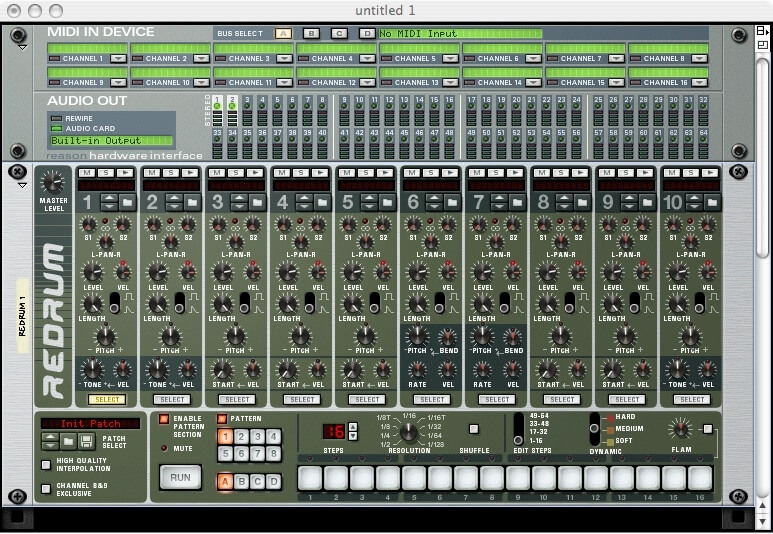
So lets look at what we have presented to us in the picture above. At the top of the screen we have the Reason Mixer. For our purposes right now, we’re not going to be messing around with that. We’ll leave it as is.
The top portion of the ReDrum sequencer shows the 10 individual drum samples that the sequencer will allow you to load. The lower left hand corner of the sequencer allows you to load a drum patch. These are recommended patches that include 10 different drum samples. Reason’s factory sound bank includes over 100 separate drum patches to suit your needs. To load a patch, click on the folder icon between the arrows and floppy disc. Lets open up a kit now. I’ve chosen the Groovemasters Rock Kit #1 from the Rock Kits folder.
This kit has loaded me up a realistic sounding rock drum set. I have a kick drum, a snare, several toms and hats. You can solo each of these sounds by clicking on the “Play” arrow at the top of each sample on the top of ReDrum.
Now, you’re probably wondering what all those knobs, sliders and buttons below each sample is for. These are your sample modifiers. They include the individual sample levels, panning, pitch correction, sample length, and attack profile. All of these modifiers can be utilized to help create a more realistic and humanistic feel and sound to your programmed drums.
Next up in order of importance is the actual sequencer itself. On the bottom half of the ReDrum module you’ll find 16 square boxes. These boxes represent beats within a measure where a drum sound may land. A basic drum beat generally will be based off of sixteenth notes, so it stands to reason that there would be 16 boxes.
We now know the basic layout of the drum computer. Now we need to start building a drum pattern. Lets start by thinking about how a typical rock drum beat sounds like.
Lets start with a hi-hat. Many rock drum beats are going to include a hi hat eighth note rhythm where the hats fall on beats 1 And 2 And 3 And 4 And. Lets start there. Click “select” button on the bottom of a hi hat sample and place your hi hats on the corresponding beats. You should now see this.
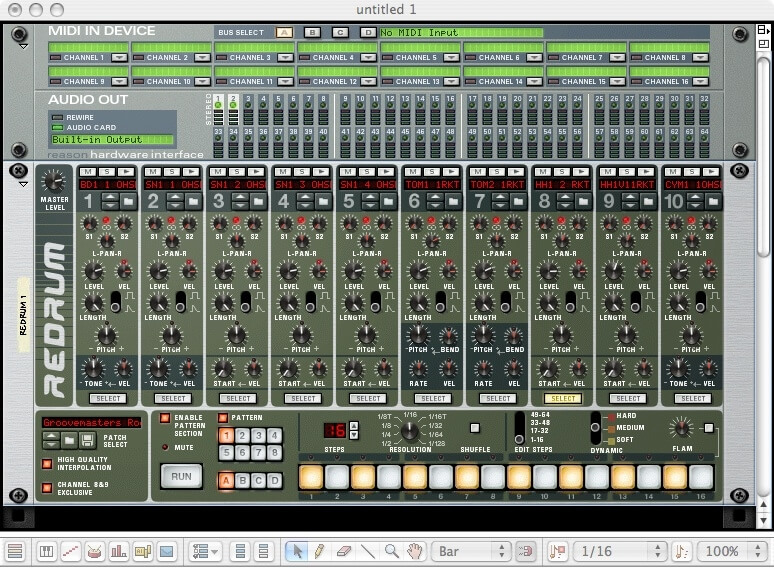
Click the “run” button and you’ll hear an eighth note hi hat rhythm. It sounds pretty standard, but also very mechanical an decidedly too perfect. Lets add a little bit of nuance to the hats. Above the sequencer boxes, towards the right is a slider that is set to “medium.” Move the slider to Hard and click on beat 1. Then, move the slider to soft and lick on the And beats. We now have hits.

Click the “run” button and now see what you have. You’ll notice that by changing the attack value to create a louder sound on beat 1 and softening the attack on the And beats has helped to create some push-pull and also accent measure changes.
Now we’ve got a steady rhythm of hats. Obviously however, we want to add some additional drums into the mix. Lets add a kick drum.
Select a kick or bass drum from your drum patch. Lets then start by adding a drum kick on beats 1, 7, 11 and 15. Lets make beat 1 a hard kick, beat 7 and 15 a medium kick and beat 11 a soft kick.

Now we’ve got the beginnings of a great groove. What we need now is a snare to really bring out that push-pull groove we want. Lets add a medium attack snare on beats 5 and 13.

Now that’s sounding more complete! We now have a drum loop that sounds like this.
This is the basics of drum sequencing from a technical standpoint. Clearly, there’s more to it than that however. We need to think about how drums are used in music and what devices they use to create certain feeling and mood.
The drum loop we’ve created here is a solid rock groove, but lets be realistic, we don’t want that single measure loop repeating itself ad-Infinitum throughout our entire song or track. So lets talk a bit about what we can do to turn this single loop into a drum groove for our production project.
Alteration: The first thing we should think about when programming our drums is that a drummer doesn’t play the same drum loop over and over throughout a song or track. The drum pattern tends to change and it does so frequently. A good way to go about this is to create three to four separate drum patterns and interchanging them throughout the song. Perhaps one pattern is used for the chorus. Another for the refrain, and yet another for the chorus and bridge.
Fills: Drummers use what’s known as a fill to signal a change or buildup in the music. Fills are generally created by traversing the tom’s and snare in a “roll” with a buildup towards a large crash symbol hit on the 1 beat of the next measure. It breaks up some monotony while signaling the band that a new section of music is on it’s way. Obviously the snare and tom rolls aren’t the only types of fills. Experiment with sounds and rhythmic patterns to create fills that fit the production you’re working on.
Silence: An abrupt stop in the drums for a quarter, half, or even a full or multiple measures can really create tension in the rhythm sections of your song. Only to come back in on a hard kick and crash. This is another great way to signal the coming of a new musical passage.
Humanistic Elements: Since drummers are human, they make mistakes. Some of the sounds that are created have started becoming intentional. The flam for instance. Where a drummer hits the stick on the edge of the drum instead of the sound surface. Then there’s the simple fact that almost nobody can keep perfect time when adding elements that are on 8th, 16th, 32nd note intervals. This odd meter without perfection creates what we consider groove and can be emulated on a drum machine by using the “shuffle” feature. Adding a small amount of shuffle to your drum patterns can go a long way to creating a realistic drum section.
Amplitude: A human drummer doesn’t, but more importantly can’t play every note at the same volume. Making sure that your drum patterns include peaks and valleys in amplitude on the note strikes helps create groove and keeps the pattern from sounding too mechanical.
Human Impossibility: Does the drum pattern you are creating work from a humanistic standpoint? Drummers have two hands and two feet to use while playing drums. For instance it’s impossible to play an open hi hat and a closed hi hat at the same time. Most higher end drum sequencers know what is and isn’t possible and will disallow you from creating drum patterns as such. Some however don’t. That’s not to say there isn’t room for the impossible. After all, we’re programming drums, not playing them. There’s room for impossibility.
When taking all of these items into account, it’s easy to create drum patterns that will create movement and depth to any recording project.
This article is meant to be an introduction to drum sequencing. We will delve further into arranging the drum patterns we create and into more in-depth techniques such as creating programs with resolutions beyond 16 beat measures. We will look at this as we build our production from our ground up.
The next item we’re going to be taking a look at before we can really get started is how to use a sequencer’s piano roll.
Spend some time this week playing around with drum machines and drum patterns. Create fill patterns, differentiate and think about drums in a humanistic way.
Until next week, happy recording!